April 2nd 2014
March 26th 2014
March 20th 2014
March 10th 2014
Feb 15th 2014
Purpose and location of the Disk Signature in the
Master Boot Record and how to see and manually change it.
The Disk Signature is a unique ID number that Windows writes to a specific location inside the Master Boot Record (MBR) on the first sector of every hard drive that it sees. This signature dates back to Windows NT 3.5 in the mid 1990s and was then referred to as the Fault Tolerance Signature because its primary purpose was to help a booting or booted operating system uniquely identify individual hard drives in a fault tolerant dynamic disk raid configuration. It still has this use and others in the IT world of servers and disk clusters but from 2007 and the release of Vista it also became a vital component in how the Windows boot files find the hard drive of the operating system to be started. In the absence of a sought after disk signature the Windows bootmanager will in its default configuration be unable to locate operating systems on classic MBR configured hard drives. (Note that it is different on the new GPT styled hard drives where the MBR disk signature no longer has any involvement in the boot process.)
Determine a Disk Signature.
From inside Windows perhaps the easiest way to see a disk signature is just to open the Windows registry editor regedit and navigate to the key - HKEY_LOCAL_MACHINE\SYSTEM\MountedDevices

As you can see in the right hand pane of fig:1 each device that Windows has allocated a drive letter will have its own \DosDevices\ line with a long alpha/numeric number in the Data column. The devices with the shorter 24 digit numbers will be devices that are actually partitions on a hard drive - in our example this is the C: E: F: and G: drives. The A: and D: devices have much longer numbers and are not devices that typically use MBRs or their disk signatures - for example Floppy, CD/DVD, USB flash keys/cards, or GPT configured hard drives. The DosDevices data numbers on GPT styled drives will include partition GUID numbers as opposed to MBR disk signatures and will be double the length at 48 digits.Other devices will be more than double this length again.
The C: drive on our machine has a 24 digit number so we know this is a partition on an MBR hard drive and we can see the Disk Signature of that drive in the first 8 digits of its number. The C: drive is therefore a partition on an MBR hard drive with the Disk Signature of c8 8b 89 55 and the G: drive which has the same first 8 digits is another partition on the same hard drive. The E: and F: drives both show a different disk signature of 5a 8a f8 78 and so this tells us that this particular PC has a second MBR hard drive that these other partitions are on.
If you have a non-bootable drive that you can connect to a working PC, even by USB, then as long as it contains a partition that Windows can mount and assign a drive letter to, you will see the disk signature for that drive in the corresponding data number.
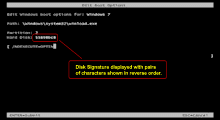
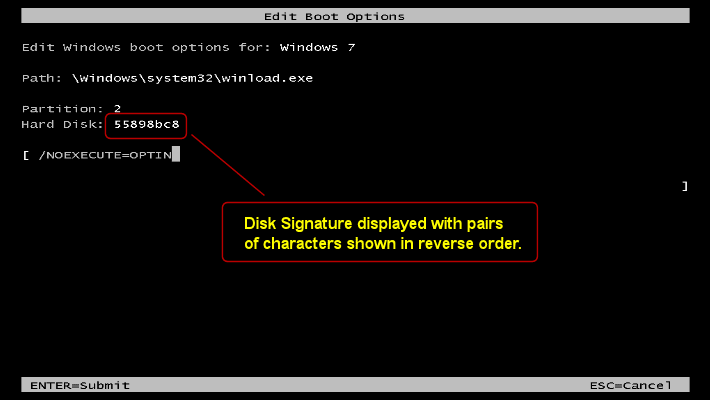

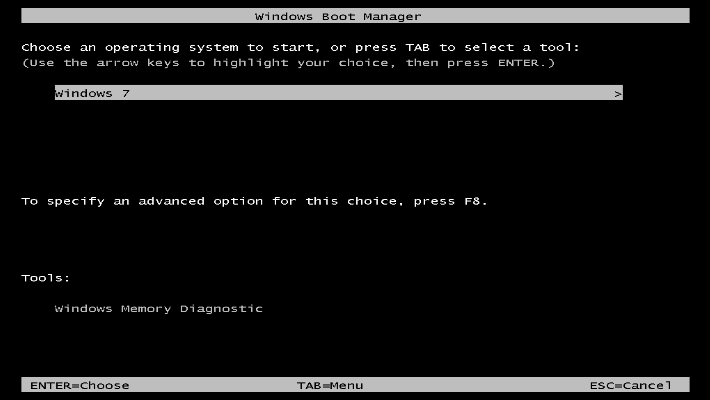
If you have a dual or multiboot machine using the Window's bootmanager then you will naturally see the boot menu screen at every startup (fig:2). In our example here there is only one boot option so this screen will not normally appear by itself at boot time. To get it to show, tap the spacebar repeatedly at the end of the bios POST (Power-On Self Test) and just before Windows starts to boot, (Win-8 see here). Highlight a boot entry and press F10 and you will go to the Edit Boot Options screen (fig:3) for that operating system, where you will see the disk signature of the hard drive that operating system is on. (On GPT styled drives it will be the longer GUID number of the drive that will be shown.) In our example the signature is shown as 55898bc8 but you need to split it into 4 pairs of 55 89 8b c8 and then reverse the order of the pairs to see it in the same format of c8 8b 89 55 which you see in the other examples on this page.
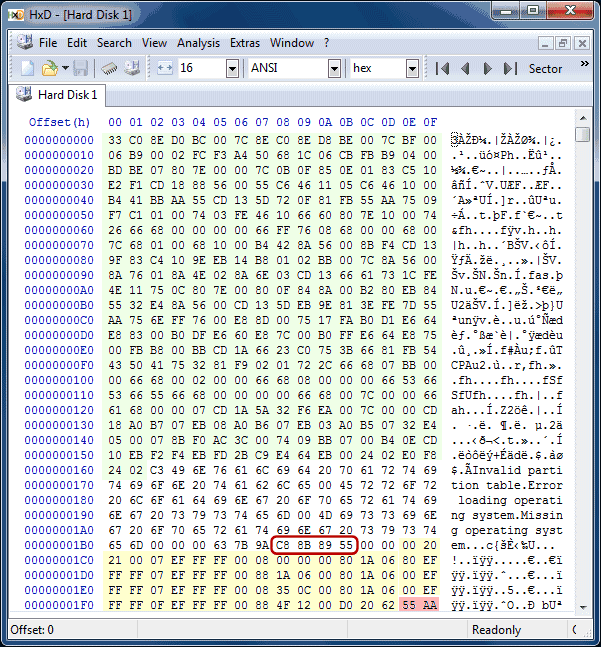
In the following screenshot we have HxD running from inside Windows and we have opened Disk 1 on our machine and have resized the app window down to display just the first sector (Sector 0) and we have circled the signature and colored some sections for easier identification. Be aware that not all Hex/Disk editors will automatically display the MBR in the format shown here. The MBR sector will always end with what some call the "Magic Number" which is 55 AA and we have shaded in red. Make sure that it is at the bottom of the two right most columns of a 16 column grid and the disk signature will be as we have circled.
The Disk Signature can be any 8 alpha/numeric digits from zero to 9 and from A to F and only has to be unique to that of any other MBR configured hard drive that is going to be visible to Windows. The algorithm that Windows uses to generate these digits does suggest it is not 100% random because it sometimes throws out similar pairs, but from experience we believe this is just an affectation you can ignore. Once you know where the signature is it is fairly straight forward in HxD to open the disk in write-mode and change it. You will need administrator privileges in Windows and will have to click through a few HxD warnings, but you just over-type the current digits and Save All.
The partition table takes up 4 lines with each line being the table for one partition, which is the reason why you can only have 4 primary partitions on a hard drive. Only 4 primaries is an historical limitation of MBR configured hard drives, but this is now changing with the introduction of the new GPT method of configuring hard drives, where it is possible to have 128 primary partitions. If you were to look at the first sector of a GPT configured hard drive in HxD it would be empty apart from one dummy partition entry for legacy reasons and perhaps a disk signature, which would not have the same relevance at boot time as it does for MBR styled hard drives.
There are actually very few occasions you should be manually changing disk signatures and almost never on a hard drive you are currently booted into. Make sure you understand what you are doing before tampering with signatures or messing with a program as powerful as HxD. One false move and you may never see your data or operating system again. Please read our Disclaimer and Advice pages.
While PartedMagic does not yet have a built-in disk sector editor it is easy to add one yourself. The free GPL licenced WxHexEditor is a standalone portable app, so there is no convoluted or difficult Linux app install required. You could just download it directly from the Firefox browser in PartedMagic and run it from the desktop, or preferably have it on a usb stick and run it from there. You can download the Linux version from a Windows machine and extract/unzip the tar.bz2 file with a suitable compression tool such as 7zip or Izarc and transfer the extracted folder to your USB stick. (You can of course use any Live Linux distro on disk/usb instead of PartedMagic but you may have to know your way around Linux admin or file permissions and disk access restrictions).![]() See this PartedMagic forum post on WxHexEdit.
See this PartedMagic forum post on WxHexEdit.
![]() Tidying the Registry's MountedDevices key
Tidying the Registry's MountedDevices key
![]() Recover from a Changed Windows Drive Letter
Recover from a Changed Windows Drive Letter
![]() Arm Yourself With a Few Basic Recovery Tools.
Arm Yourself With a Few Basic Recovery Tools.
![]() A Beginners Introduction to Partitions
A Beginners Introduction to Partitions
![]() A Visual Guide to the Boot Sequence
A Visual Guide to the Boot Sequence
![]() The Disk Signature and the Windows Boot Process
The Disk Signature and the Windows Boot Process
![]() Fixing a Windows Disk Signature Problem
Fixing a Windows Disk Signature Problem
![]() Resolving a Disk Signature Collision Warning
Resolving a Disk Signature Collision Warning
![]() How the Signature is Connected to Drive Letters
How the Signature is Connected to Drive Letters
![]() MBR or GPT? - Establish a Hard Drive's Style
MBR or GPT? - Establish a Hard Drive's Style
The best of our tested disk sector editing tools - Windows Linux and Mac.
The disk edit in the free version expires after 14 days, but standard version is cheap.
own disk sector hex editing tool. - Basic and simple, but quite pricey.
![]() Tech Bench Some other options and info for the more advanced tweakers.
Tech Bench Some other options and info for the more advanced tweakers.
If you already have a bootable Windows Live CD/DVD such as BartPE, WindowsUBCD or Winbuilder, or you are able and motivated to build one, then you can run HxD or any disk editor of your choice from there. Either include it in the build or just as with our above PartedMagic example get a standalone portable version that you can simply transfer to desktop or run directly from disk or usb. There are both installable and portable Windows versions of HxD - download page.
Those familiar with the command-line can view and edit a disk signature with the Windows-7 (not Vista) Diskpart utility. Commands list disk then select disk(x) then detail disk will show you the Disk ID: in the reversed format as explained above. Note that the Disk ID: of a GPT styled hard drive will be a much longer GUID number. To edit the disk signature use the new Uniqueid command. To restore our example signature from above would be uniqueid disk id=55898bc8 - Diskpart can also be run from WinRE on bootable media.
disk sector editing utilities - DiskSpy and PTS Disk Editor.

Chip maker and OEMs talking Dual-Boot with Windows and Android at CES 2014:
All product and company logos, icons and images that are reproduced on this site are the property and trademarks of their respective owners and are used here merely to illustrate their products, NOT to indicate or infer any endorsement or partnership unless otherwise stated. We have endeavored not to reproduce copyrighted images or graphics or infringe upon the rights of any trademark or copyright holder. If you believe or suspect we may have breached the permissible use of copyrighted material then please bring it to our attention. The reproducing or copying of original material from this site is currently allowed for non commercial purposes with the provision that your source is clearly indicated and that a back-link to the referenced information is included. Thank You. See our full Terms of Use. Material on this site is not guaranteed to be free of errors. Multibooters.com 2012 - 2013